My obsession with Hutch makeovers
Before thrift Store hutch


Thanks to Pinterest I learned "how to" make a spray paint tent. A few PVC pipes cut to fit inside the garage and plastic drop cloths make a great tent.


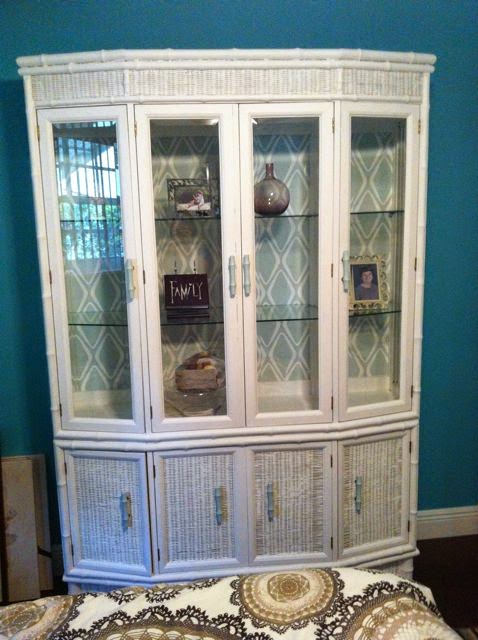
After Hutch


Steps to "Making over" the thrift store hutch
Things you will need
- Easy Liquid Sander Deglosser
- Sandpaper 120 Medium Smooth
- Paint sprayer, I used Wagner Optimus 5.4 Sprayer
- Hi-gloss enamel Ultra pure white paint by Behr
- Carrot Cake by Valspar inside hutch
- 2-3/4 in. Pine Taper bun foot
- High Density foam paint rollers for painting inside the hutch
- Blue painters tape
-
Optional
- 6 plastic drop clothes
- Roll of painters tape
- 12 PVC pipes, you will need 6 PVC pipes cut to create the top and bottom square frame of the tent. 4 PVC pipes cut to the height you want for the tent.
- 6 PVC pressure 90 degree slip x slip elbow with taped side outlet to connect the pipe together.
Steps
1.Take all the hardware off the hutch, you can use a screw driver or drill to remove door handles and door hinges.
2. Once you remove the hinges that connects the doors to the cabinet remove the hinges from the doors. Keep the hinges and screws in a safe place until you need to re-attach the hinges.
3.I put the Easy Liquid Sander Deglosser onto a cloth and rubbed it all over the cabinet. I did this so I didn't have to strip the old paint off the hutch.
4. I followed the directions on the Deglosser container and waited for the product to work. I then used 120 sandpaper on all the flat parts of the cabinet. The light sanding smooths out the flat surfaces.
5. After sanding down the cabinet I vacuumed the entire cabinet to remove debris.
6. I put together the spray paint tent, brought in saw horses to set up each piece of the hutch. The top of the hutch was separated from the bottom of the hutch. The bottom and top doors where laid out on the floor.
7. I removed the glass from the doors on the top section of the hutch. Removing the glass wasn't hard, I removed the rubber striping that holds the glass into the back of the door to separate the glass from the doors. Hold the rubber striping to the side to use again when you replace the glass.
8. I added the Hi-gloss enamel pure white paint to my paint sprayer and sprayed the entire cabinet. I sprayed the cabinet 3 separate times. The bottom doors had a lot of detail to cover so it took more paint to cover.
9.I let the hutch dry for 24 hours.
10. After the hutch was dry I put the bottom of the hutch onto the saw horses and turned it upside down. I then figured out the placement of the bun feet and screwed them into place.
11. After the bun feet were attached and with help from my husband we re-attached the doors to the cabinet screwing all the hinges into the doors and then to the cabinet.
12. The glass from the doors on the top section of the hutch needed a little cleaning. Using a razor blade and glass cleaner I scraped the paint off.
13. I put the glass back into the doors and then added back the rubber striping to hold the glass in place.
14. I used painters tape to tape off the inside sides, top and bottom of the hutch to prepare for painting the back of the hutch.
15. I use 6 inch high density foam paint rollers for painting in tight spaces. I poured my Carrot Cake paint into a paint tray and used the paint roller to roll the paint into the back wall of the hutch. I needed 2 coats of paint in the hutch.
16. After the paint dry's remove the painters tape carefully and touch up the white paint as needed with a tiny paint brush.

It looks very nice. Now you can use the sprayer to paint that green wall. Guess who
ReplyDeleteYou ROCK! That is awesome Jamie! I always thought it would be so fun to have a biz flipping furniature. I love painiting old wood white but I am no good at it yet!
ReplyDelete